
How to Install Tensoflow 2.x with CUDA and cuDNN on Ubuntu 20.04 LTS
In this post I will guide you in installing Tensorflow 2.x with CUDA and cuDNN on your ubuntu machine.
If you have NVIDIA graphics card in your system and want to use it to train machine learning and deep learning models, you need to first install the CUDA and cuDNN libraries in your system.
Below is my system configuration and the version of CUDA and cuDNN:
OS : Ubuntu 20.04 LTS
Let’s get started!
Installing Pre-requisites
Before you install anything we need to make sure that the necessary graphics drivers are installed in the system. These drivers are required to communicate with the underlying graphics card.
Open the terminal by pressing cltr + alt + T and type the below command.
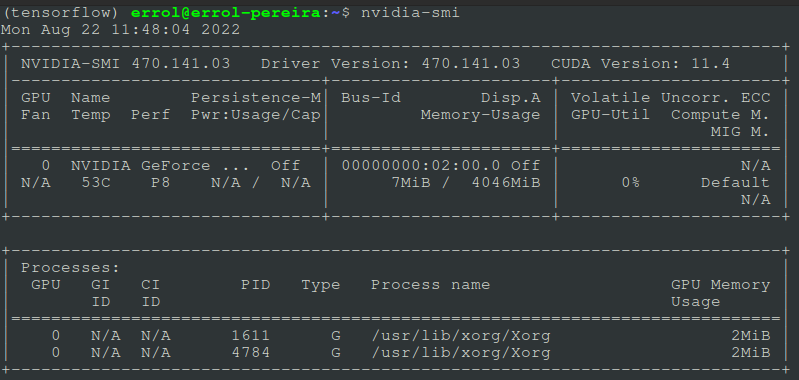
nvidia-smi
If the command returns a message saying “nvidia-smi” is not recognized by the system, then install nvidia-smi by running the below command:
sudo add-apt-repository ppa:graphics-drivers/ppa
sudo apt install nvidia-driver-470
After running the above command, run the nvidia-smi command again to check if the drivers got installed successfully. You should see a similar output as below.
If you are still not able to see the above output restart your PC and run the command again.
Installing CUDA and CuDNN for Tensorflow 2.x
Visit the tensorflow guide to check the compatable version of Cuda and CuDNN for the corresponding version of tensorflow you are using. For this guide I am using Tensorflow 2.9.1 which uses Cuda 11.2 and CuDNN 8.1.
Open a new termminal and create a new conda environemnt so that all your dependencies are encapsulated in this specific environment.
conda create --name tensorflow python=3.9
Once the environment is created go ahead and activate the environment.
conda activate tensorflow
Replace the tensorflow with the name of the environment you will create.
Now run the following command that will install Cuda and CuDNN libraries on your ubuntu machine.
conda install -c conda-forge cudatoolkit=11.2 cudnn=8.1.0
export LD_LIBRARY_PATH=$LD_LIBRARY_PATH:$CONDA_PREFIX/lib/
Installing Tensorflow 2.9.1
Once the Cuda and Cudnn depenndencies are sorted, we can now move on to installing tensorflow gpu on the system. For the latest tennsorflow version, it is now not necessary to install specific version of tensorflow for CPU ad GPU. We can just run the below command and it will install the necessary version in your system.
pip3 install --upgrade pip
pip3 install tensorflow
Testing the installation
We can test the installation using the below command
python3 -c "import tensorflow as tf; print(tf.config.list_physical_devices('GPU'))"
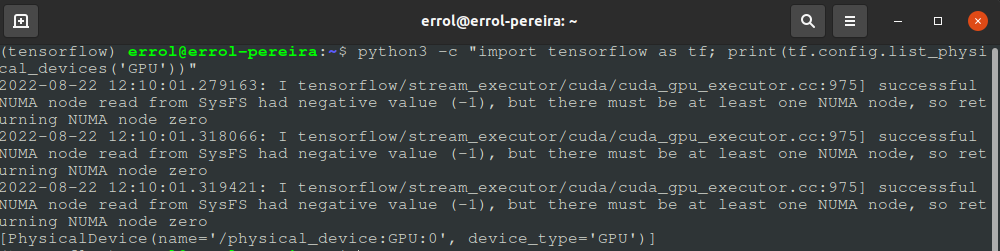
The above command will list the GPU devices available on your system. If you are able to see your graphics card device number pop up as an output of the above command then the installation is successful.
Shell Script
For those who find it cumbersome to run the commands one after the other, I have created a shell script that will automatically install all the dependencies for you. Just run the script in your terminal and everyhting else will be taken care for you. You are welcome :)
For people like me who likes to run their code using tensorflow 1.x, I have created another script which will install tensorflow 1.15 with the cuda and cudnn dependencies. Welcome again :)